Security cameras are an important tool in the protection of facilities and critical assets. However, the phrase “what you see is what you get”…applies…literally. Proper set up of security cameras is directly related to the level of effectiveness they will provide. One aspect of setting up a security camera is its field of view (FOV). Webster's would tell you that a camera's field of view is the angle between two rays passing through the perspective center of a camera lens to the two opposite sides of the format.
Security cameras are an important tool in the protection of facilities and critical assets. However, the phrase "what you see is what you get"…applies…literally. Proper set up of security cameras is directly related to the level of effectiveness they will provide. One aspect of setting up a security camera is its field of view (FOV). Webster's would tell you that a camera's field of view is the angle between two rays passing through the perspective center of a camera lens to the two opposite sides of the format. It can be further defined as having a vertical component (Vertical Field of View) and a horizontal component (Horizontal Field of View). In layman's terms that means it's the image you see from the camera in either the live or recorded view. That sounds easy enough, but there are several mistakes that you should take care to avoid.
1. Not doing your homework 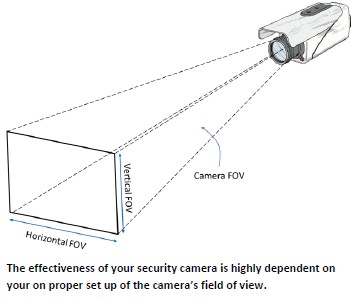
One of the first things to realize is FOV is not an independent variable. As outlined in the white paper "8 Things to Consider when designing a camera perimeter," camera layout can be an expensive proposition, and it is even more expensive when done wrong. You need to consider that pole placement, detection scene, blind zones and FOV are dependent variables. Changing one impacts the others. The existence of the variable focus lens has often caused the attention to this dependency to be overlooked, with the idea that camera misalignments or scene issues can be accounted for by later adjustment of the variable focus feature of the lens. This is a mistake and a potentially costly gamble.
You should go into your design considering each aspect, including a fixed FOV, and its dependency on the other set up variables. Brush up on your geometry, find and use a FOV calculator and a good camera layout tool. Make sure you verify your detection scenes, overlap your camera coverage for blind zones and define your FOV settings so you have some wiggle room after the equipment is installed. There will be inaccuracies in pole placements and unforeseen scene issues, but you shouldn't count on a varifocal lens adjustment to be able to accommodate.
2. Thinking like a photographer
We all remember our high school photography class and the rule of thirds: two thirds of the scene should be ground and subject, one third should be reserved for the sky. We never seem to get it right when we're taking photos of Aunt Beatrice or our vacation photos from Hawaii, but it's amazing how many times we get it right when setting up security cameras. Although the “rule of thirds” is pleasant to the viewer's eyes, in the security world, it does not apply. There is almost no security application where viewing the sky has any value.
However, there are many reasons why you should not look at the sky. These include items such as glare and blinding the camera during sunrise and sunset. Another consideration is the idea that you are essentially wasting 33 percent of your video storage and network bandwidth on the interesting cloud formations. The only reason to have sky in your FOV is to give a point of reference and insure you have enough room for any vertical detection zones. As a general rule, 10 percent of the scene is more than enough to give a frame of reference. When considering vertical detection scenes, for example insuring you can monitor for intrusions that come over a fence, even less view of the sky is required.
3. Going to bed too early
Job site walks are an extremely valuable part of the security design process. Good consultants and educated site owners make these available to potential security bidders so all the unique aspects of the site are understood in the early planning phases of a security design. I'm sure you or your company has participated in many of these, but I'd be curious how many have been through a night time site walk? Most times these are thought as unnecessary, as a security design will typically include some type of consideration for low light viewing: infrared illuminators, thermal cameras, etc.
However, there are many sources of existing light that need to be considered when setting a field of view: existing facility lights, periodic headlights, lights from adjacent facilities, sunrise/sunset, reflective light (water / windows), etc. Light sources can play havoc on cameras in a variety of ways, so it's important to know where they are and to plan your FOV around them if possible. Unfortunately, if you don't plan on staying up for the night shift, you won't have the opportunity to explore where these lighting issues might be lurking.
4. Only thinking about the camera
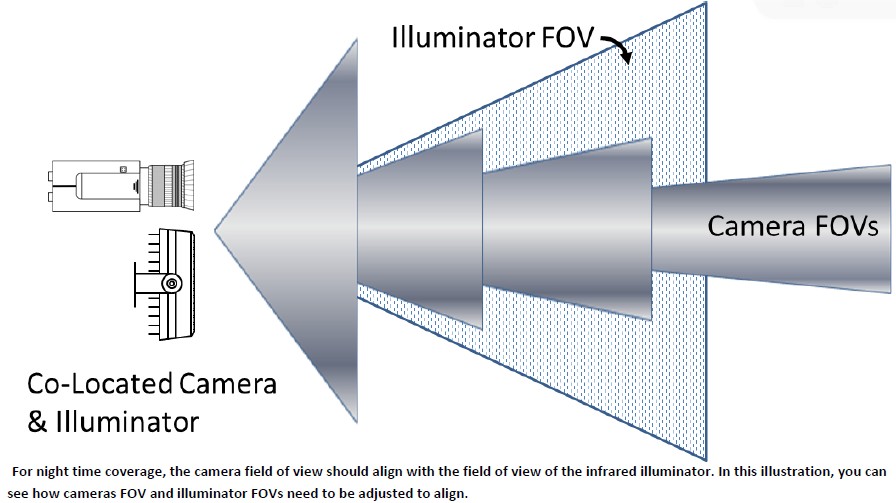
By the very definition of FOV that we explored in the first paragraph, it would seem odd to think about anything other than the camera, but in fact, one major mistake in setting up the field of view of the camera is not considering the field of view of the illuminant. Whether you are using IR illumination, or even white light illumination, for night time monitoring the most important aspect is not the FOV of the camera, but rather the FOV of the IR illuminator or visible light source. If you have ever viewed a camera at night with little or no illumination then you understand why this is important, you basically get a black video feed. If you want your night time FOV to correspond with your daylight FOV, then you need to insure that you illuminator beam matches your camera FOV in both distance and width.
Some illuminators have adjustments where you can make the beam narrow and long, or wide and short. Others have a fixed light pattern. In almost all cases, the resulting FOV which matches the illuminator's capability will be a substantially shorter distance than what can be achieved with the camera alone in full daylight conditions. Not taking the FOV of your illuminant into consideration can be a costly mistake in terms of coverage. You'll need to stay up late to insure these coverages match, but make sure you also consider the FOV of your illuminant during the planning phases, or you could end up with gaps in your night time coverage.
5. Not understanding the idea of pixel-dilution
Pixel-Dilution is the idea that the more information that is attempted to be represented by an individual pixel, the more diluted that information becomes. This issue typically arises when setting up a scene and opening up the camera's field of view so it is as wide as can be accommodated by the lens. Its available information, so why shouldn't we widen the lens to capture it? The answer is…it depends.
The important concept to understand is a camera is designed to give you a certain number of pixels, which is effectively video Information. Changing the lens or the zoom level of a lens, gives you a different FOV, but it does not give you any more pixels. The pixels are constant. So widening the scene effectively dilutes the video information of any particular pixel. I once heard it explained as follows, "Consider the number of pixels you have with a given camera as a cargo net made of elastic. Each square in the net represents a pixel. If you widen the view of the camera, you effectively stretch the net. You have widened the pixels, but remember a pixel is only a single value, so now you've stretched that single value over more of your scene." In practical terms, that means you will have less information about a specific object at a given distance. As an example, a narrow FOV may give you enough pixel information to allow you to read a person's baseball cap at 100m, while a wide FOV of that same person may not contain enough information in the diluted pixels to be able to determine if the person is even wearing a hat. So it is a planning decision to determine whether it is more important to view a wider area at the expense of more detail video information, or to restrict the size of the FOV and gain that data. The mistake is not understanding the tradeoff being made.
6. Getting an interesting view
We all like to be entertained, but that isn't necessarily the best approach when setting the FOV of a security camera. A common mistake is to include “interesting areas” in the FOV, versus “areas of interest.” For example, consider a situation where a high traffic sidewalk runs next to a facility's perimeter fence. Often times the camera's FOV is set to include this high traffic region. However, if the area of interest is not the sidewalk itself, but rather the region between the sidewalk and the fence, the argument is why the sidewalk would be included in the camera's FOV. Every movement on the sidewalk now becomes the responsibility of the monitoring guard or security software to detect and assess as a possible threat. The same can be said of roads or areas of water that occur in the background. If the area is not of interest from a security standpoint, then care should be taken to consider whether the FOV should include the region.
7. Not understanding the mission on the camera
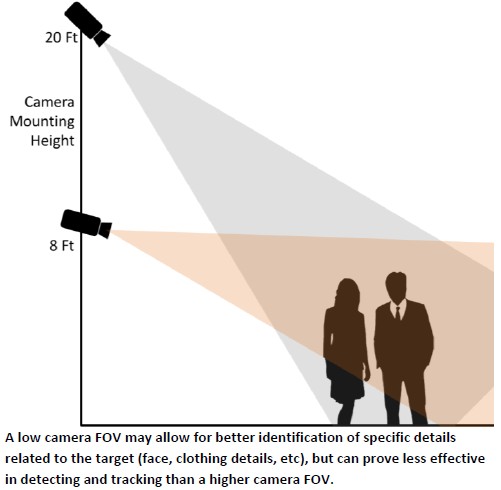
A final aspect of the FOV is understanding the intended mission of the camera. In practice this rarely goes beyond the set-up of the detection area. However, as cameras become higher in resolution, there are more missions to consider. For detection, it is typically better to have a FOV which is taken from a higher vantage point. This helps avoid occlusions, allows for better understanding of the target's current track and potentially trajectory.
However, a higher vantage FOV is not always conducive to facial or clothing identification , where the face or clothing graphics are seen as at an angle, or blocked by a hat. The opposite holds true, where a lower FOV results in better identification, but potentially poorer tracking and detection. Again, the mistake is not whether to have a high FOV or low FOV, the mistake is not understanding the benefits and drawback of each, and not using the camera's mission to drive the most appropriate height when setting the FOV.
Summary
Often times the setting of the field of view of a camera is taken for granted, with the idea that it will be adjusted during the final phases of installation. The concept of field of view is pretty straight forward, so not a lot of forethought should be required. However, as you take the time to further analyze its relationship to other aspects of the perimeter design, the security objectives and even the camera itself, it becomes evident quickly that it is a crucial aspect of the total design and something that needs to be designed early on in the process. This paper highlights some mistakes commonly experienced in the field, and hopefully can be used as a guide to avoid these types of issues in future deployments.