Protecting critical facilities and their resources against intrusion and misuse of materials is a critical role consultants and security integrators deal with every day. There are many guidelines that have been released that provide information as to the type of security measures that should be considered when protecting these facilities.
Protecting critical facilities and their resources against intrusion and misuse of materials is a critical role consultants and security integrators deal with every day. There are many guidelines that have been released that provide information as to the type of security measures that should be considered when protecting these facilities. However, the details involved with making these measures a reality are often missing. As the popular saying goes "the devil is in the details." These details contribute greatly to the installation and operational performance of such systems. Whether you are a security professional trying to secure the physical assets of your company, a consultant helping that owner or an integrator installing the system, remembering a few key tips can go a long ways in ensuring the implementation meets the objective. Here are 8 things to consider when designing a camera-based security system, or when reviewing your existing one.
1. Understand Your Camera
Selection of a camera is often the easiest and most difficult aspect of the design. There are thousands of options out there, tons of spec sheets, IP or analog, dome or bullet. The choices are overwhelming. However several characteristics of the selected camera sensor have a major impact on the placement and resulting coverage. It is important to take the time to properly address these items.
Lens: This is where most people start. The first reaction is to get a wide lens to be able to view as much of your facility as possible. This is certainly a valid approach; just remember that widening the view essentially dilutes your pixels.You only have so many pixels and by widening the field of view you are spreading the same number of pixels over a wider area. One net result is the reduction in the achievable detection distance. The converse approach is to select a very narrow lens to effectively increase the detection distance. Also acommon strategy, but don't forget to think about the intended target size and speed. A narrow field of view means that the intruder has a shorter span of video to get across before being out of the camera view. The worst case scenario is when the intruder is very close to the camera. For most applications, the lens choice should give you enough scene width to allow ample time to detect the intruder at its maximum expected speed near the camera.
Resolution: This seems like an easy one. Higher resolution cameras give you more pixels, which in turn provide the ability to “see” greater distances and more details, both with an operator at the helm or through the aid of a video analytics product. However, if you are not careful this ability to “see” more through higher resolution can be costly, as it can have a major impact on your network usage, storage costs, and processing requirements. The key is to understand what resolution is really required. To do that you need to know the smallest target you want to detect (human, car, etc.), how far away you want to detect that object, and how many pixels of resolution are required by your video analytics software or the eyesight of your security folks to be able to “see” that object at the desired distance. Once you have that information, you can then go back to the camera specification and determine whether it can provide you enough pixels to accommodate. If not, you may consider going to a higher resolution camera, a larger lens, or decreasing your required distance. If your experience with resolutions has more to do with New Year's Eve than cameras, there are many free calculators on the internet, as well as, many knowledgeable product suppliers where you can get this information at no cost.
Image Sensor Size: If you've spent time making camera selections, then you've seen camera specification sheets and have noticed image sensor sizes, including 1/4” CCD and 1/2” CCD. When designing a robust perimeter system, always super-size, right? Perhaps, but suffice it to say that the camera sensor size impacts the resulting image of the camera. Most camera range calculators will assume you are using a 1/4” CCD sensor. If you are not, then you should probably touch base with your local camera layout expert to understand the effects of different size CCDs.
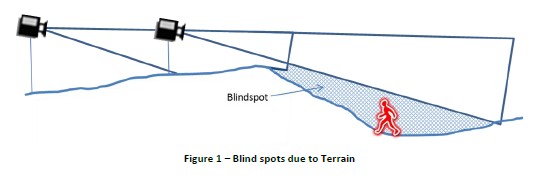
2. Consider the Terrain
In addition to obvious obstructions such as trees and buildings, don't forget to consider terrain variations, such as rolling hills, which may impact your blind zone calculations. Ditches and culverts can also prove to be a problem. Another obstruction that is often overlooked is the perimeter fence itself. Looking through the fence can be very problematic based on the angle of the view and the type of fence in question. Even a chain link fence can appear solid when viewed from particular angles at certain times of the day.